Creating, Moving, Editing, and Deleting Files from the Terminal
In this blog you will learn basic bash commands. By the end of this you will know:
- How to edit, create, move and delete files all from the terminal
- How to view a files contents
- Write bash to create a folder for new projects you are working on.
Prerequisites:
- Have read through the previous post on bash or have a general understanding of how to move around in bash
Creating Files and Folders
I left off the last post by hinting at some really neat commands that were centered around creating files and directories.
To quickly recap, the mkdir command MaKes a DIRectory, you can even add the -p (for parent) option to make multiple nested directories.
The touch command creates an empty file.
With echo you can make a file that contains text with echo "SOME TEXT" > file_name, note the >.
If you have a single > it will delete all the contents are replace it wil the text, if you include two >>, then you will simply append the text to the file.
To remember the arrow direction, I think of it like funneling a lot of text into a file, so from big to little.
If you did not do so in the previous section, give these commands a try.
Make a bunch of files and folders some with text and some without.
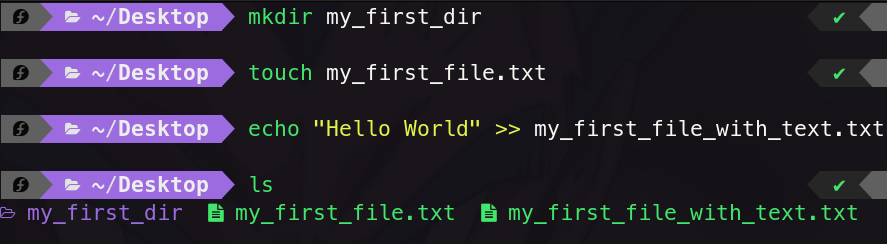
As you can see above, all three commands work, but how can we know for sure that the third command actually adding text to the file?
I mean sure I told you that there is text, but it would be nice to confirm what is there.
For that we have the cat (concatenate) command.

If the file is very large, cat often is not super helpful because to places everything in the terminal.
This is where the more comand comes in, it allows you to move through file with the SPACE and leave the file with q.
Alternatively, you could use less (which is a play on the phrase “less is more” since it is a bit more powerful).
Note: I use
batfrom the modern unix project, which replaces all three commands.
Moving Files
Often times you need to move files around, well the terminal has you covered hear as well.
First up we have the cp command, which creates a copy of the file to a new directory.
The basic syntax is cp FILE PATH to copy a FILE to a new
cp FILE DIR  # Copies one file to a DIR
cp FILE1 FILE2 FILE3 DIR  # Copies multiple files to PATH
cp FILE "FILE_copy"  # Creates a copy of a file in the same location
cp -r folder  # Note the -r option to copy recursively
cp FILE DIR/NEW_NAME  # Copies file and changes name
Try copying the files you made earlier.
Copy them with new names, copy them to new folder, etc.
Now that you have got some practice, you can learn how to move things.
Its often the case that you need to just move a file, instead of having two copies.
For that you can use the mv command to move folders and files.
Some examples for syntax are below.
Try some out a few!
mv
mv FILE_OR_DIR DIR  # Move a FILE to a different DIR
mv FILE DIR/NEW_NAME  # Moves file and changes its name
mv FILE NEW_NAME  # Rename a file (e.g., move it to the same location with a new name)
Now that we made a big mess of files its a good time to clean them up.
For that we can use the rm command, to as you can guess remove the files.
One important note is that the rm command does not send things to your trash, so if you use it, you won’t be able to recover, so do so with caution!
All the files you just made are basically junk anyways so no worries on using rm for those, this advice is more in case you want to use it in other places.
You can remove files with rm FILE, by default it won’t remove directories (you can use rmdir for that).
Of course there is a way, but it is a bit to dangerous for a beginner lesson, just note that you should never use rm -rf /!
Editing Files
Now that you know how to make a file, lets learn how to edit a file from the terminal.
There are a lot of options to edit files vi, vim, nvim (my preferred option), emacs, and nano.
Nano is by far and away the easiest place to start for beginners, so I will cover a few things with it.
Of course, if you prefer, you can always use a GUI based IDE like VS Code, Sublime, etc.
Again, like the rest of this post, this is just a taste of how to edit file from the terminal, and with these skills you will be able to make some changes, but will not be super efficient. For that, you will have to do some extra learning on your own. I personally use neovim, which notably has a steep learning curve, but is blazingly fast. So fast, I even replace my normal IDE (Visual Studio Code for it). If you are interested, I would recommend you check out The Primeagen. He is a software developer for Netflix that has some amazing videos on vim/neovim.
Ok, with that out of the way lets edit some files!
First, to get some more practice make a new folder in your Documents folder (or you Desktop if you prefer to see it) and inside that use one of the two methods above to make a file.
You can of course make a file with the nano, but this is just good practice.
To open up the file to edit, type nano and then the PATH_TO_THE_FILE you wish to edit.
Keep in mind it will depend on your current working directory, so if your current directory is /Users/Deshawn and your file is in ~/Documents/first_folder/my-text.txt then you will need to type nano ~/Documents/first_folder/my-text.txt, but if you already cd‘d into the first_folder directory, then you can simply type nano my-text.txt.
When you first open nano it should look something like this:
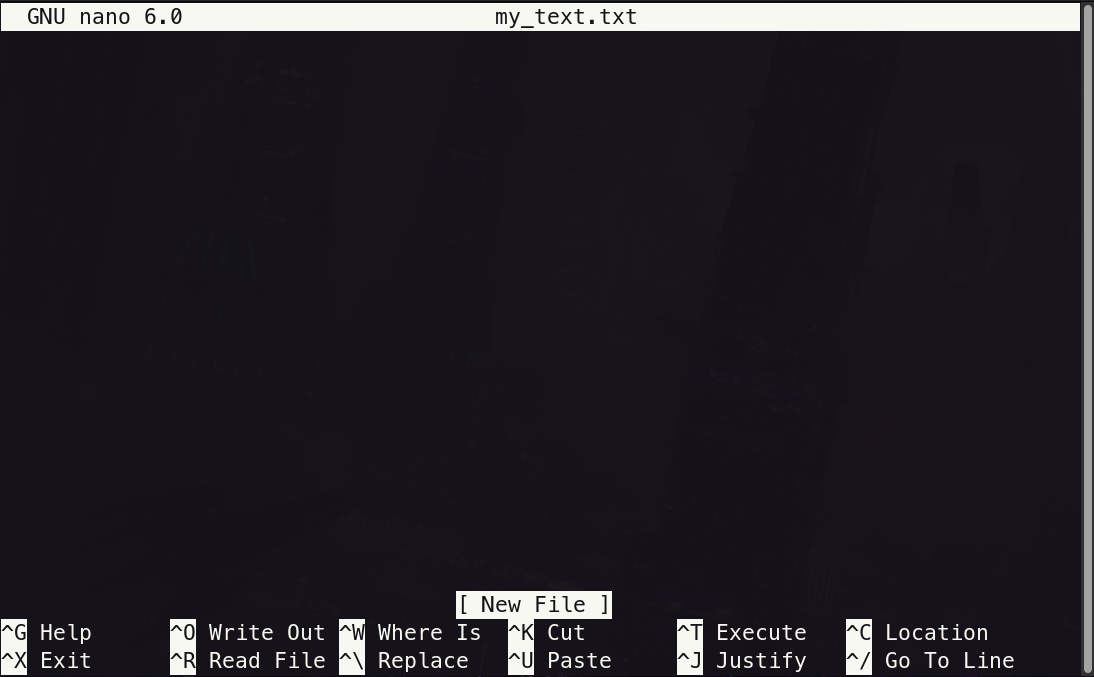
At the top center, you can see the current files name. At the bottom, you see a list of keyboard shortcuts, and just above that you see how many lines were read in (0 in my case because it was an empty file).
From there, you are free to type as you go, nano does not allow for mouse movement, though so you need to use the arrow keys to get around (which is partially why its much slower that other editors).
For vi/vim/nvim you move around with the keyboard but in a much faster way, because you use the whole keyboard, but it means you need to tell it when you want to insert text vs move around really fast. This plus needing a command to save and close a file, people tend to get stuck in these 😂. But again, after that steep learning curve it is really nice, for those who like a challenge.
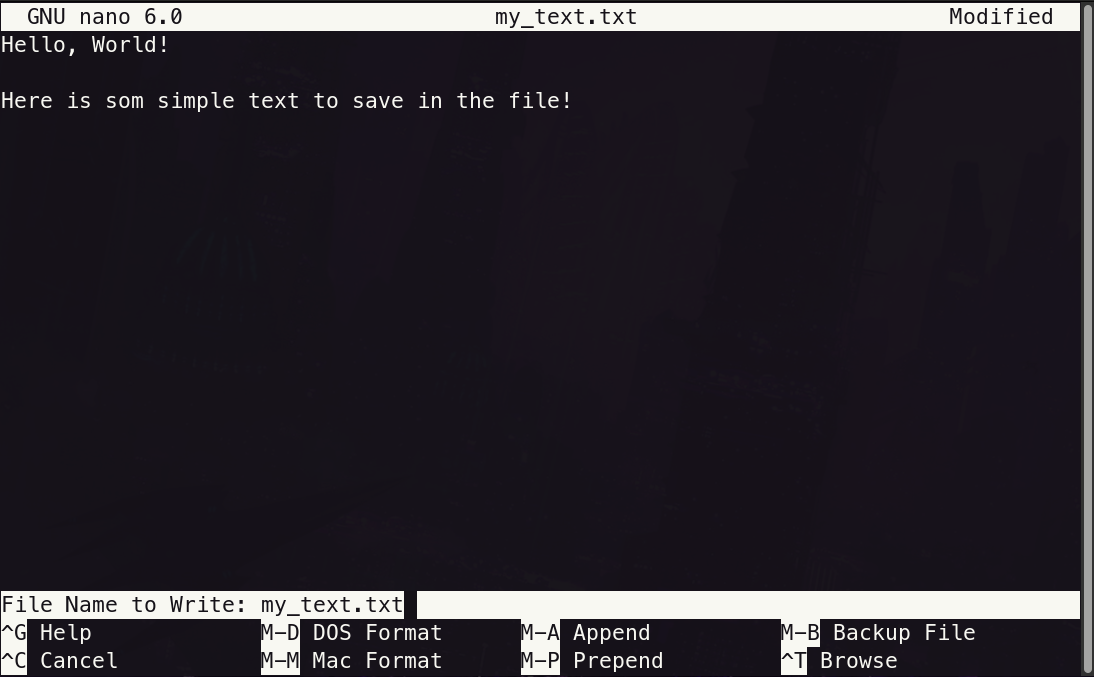
To close a file, you want to do two things, first you need to save the changes, and then close the file.
Take a look at the bottom command shortcuts if you ever get confused.
First you need to save the file, in a lot of older editors they use the term writing the file.
So in this case, to save, you just hit ^ + O, where the ^ means the Control key on your keyboard, usually the far bottom left corner.
And the O is the letter not the number (don’t use the shift key even though it displays in as a capital letter).
Once you hit that key combo, you will be prompted to save the file with the same name (just hit enter) or a new name (type out the changed name).
You typically just hit enter here, unless you have reason not too:
Finally, you can exit nano as shown in the bottom that is with ^ + X, which again is the Control key and the letter.
Congratulations! You just edited your first file straight from the terminal. You can check out the contents of the file with the cat command.
Recap
You learned a lot in the post, so I think it is important to summarize everything and quickly highlight what each command we cover does.
You learned how to create new files with touch and even how to create them with text (echo), and of course how to make directories!
You also learned how to move files around, whether is be with copying them, directly moving them, or just deleting them outright.
Finally, you learned how to edit files and even view their contents all from the terminal!
You can now do so much straight from the terminal without ever needing to open a GUI. This is super important because for cloud infrastructure and Super Computers/Computing Clusters you will often only be able to access it via the terminal so these skills are super helpful. But as per usual, these skills are not something that you can aquire through osmosis, you need to actually practice them. So make you you try them out! Below I recap each command and leave off with some extra practice before we head into the next section, where we will talk about how to start combining commands into a script so they all run at once!
Creating/Deleting Folders and Files
Before continuing, try each of the following commands out, just to you know how they work.
For all the commands the relevant arguments will be in []
mkdir: Make Directory (folder) [name_of_folder_to_make; use the-p(for make parent directories) if you want to make multiple nested folders simultaneously]touch: Make an Empty File [name_of_file_to_make]echo "TEXT" >> FILE: AppendsTEXTtoFILE, use>to replace file with text.cp: Copy [name_of_file_to_copy;name_of_location_to_copy_to]mv: Move [name_of_file_to_move;name_of_location_to_move_to; can also be used to change a files name if you move it to the same location with a new name]rm: Remove a file [name_of_file_to_remove]
Viewing Contents
cat: Concatenate (prints out files contents) [name_of_file_to_print]more: More (of the content on screen) Useful for printing out really long docs but not as good asless[name_of_file_to_print]less: Less (is more… powerful). Useful for printing out really long docs becuse you can scroll through them [name_of_file_to_print]
Editing Files
nano: A simple to use text editor. You will likely hear about other editors likevimoremacs. Both are really good, but they have a really hard learning curve, so I don’t reccomend them when you start out. I personally usenvim, which is a modern replacement forvim. [name_of_file_to_edit]
Extra Practice
Now its time to use what you learned to help automate some things.
Here, you will try to make a common folder structure that you use often.
This can be for a class, for a software development project, or for scientific research.
Try to make a new folder called folder_template somewhere on your computer and either create, move, or copy a file and folders into.
Then make README.md file with some standard text.
If you haven’t worked with md files also know as markdown files, check out my previous post on them.
Finally, add all those commands to a file, so you can setup the folder structure for all new projects (we didn’t discuss how to make workable bash scripts, but for now, you can just copy and paste for now).
Inside the newly created folder you should you should have a the following structure:
my_first_bash_script/
  |-- analyses/
      |-- plots/
  |-- expriment/
      |-- data/
  |-- lit_review/
  |-- supporting_docs/
      |-- scales/
      |-- irb_docs/
  |-- DEVELOPEMENT_DECISIONS.md
  |-- README.md
Feel free to mess around with this structure a bit to suit your own needs, but having some basic structure for all projects is very important.
For scientific and software project folders, I highly highly reccommend two separate .md files.
The README is for anyone first coming to the project on how/why to run this code and what is found where (this can be updated at the very end of the project when it is read to be published).
In contrast, the DEVELOPMENT file is a place where you should write down every decision you made for the project.
Why did you use this library instead of that on, why did you have 60 trials instead of 90, why did you exclude a subject etc.
I personally also leave a ton of links to stackexchange/overflow for how I came up with code or to justify certain things to myself.
This file can also be private and not actually published anywhere if you prefer, but trust me, especially when writing a methods sections this is invaluable.
Conclusion
In the next section, you will learn how to discover more commands on your own and how to learn how to use commands in the future! Finally, it will leave you with some inspiration for creating future projects in bash.