Navigating your Files with Bash
In this blog you will learn basic bash commands. By the end of this you will know:
- The basic commands to traverse your computer from the terminal
- The structure of commands, arguments, and options in
bash - How to edit, create, move and delete files
Prerequisites:
- None; Although it may be helpful to have read through the series intro
Knowing Your Way Around with bash
When you first learn bash there are three must learn commands. These are really important commands because they allow you to navigate around your file system:
pwd: Print Working Directorycd: Change Directoryls: LiSt (Contents)
An analogy that I like to use for these commands is imaging you are on a random street in a US city that you don’t know.
The pwd command is like looking up your current address. It will tell you were you are.
The ls command would be like looking around the street (or on your map) to see what restruants are on the street.
And cd would be like moving to a new location.
In keeping with the analogy, you can’t just move to an arbritrary new street because you don’t know this city.
Instead you have to give precise directions either from where you currently are or relative to some clearly visable space (say a big colorful building you can see from anywhere in the city).
Now let’s see these in action.
pwd
The pwd command shows where you are currently located in your filesystem and is equivalent to getwd() in R or os.getcwd() in python.
You will notice that in this tutorial, I have all the code as an image instead of code based text that you can copy.
This was done intentionally because as you first start out, you should be typing these commands in so you get used to them.
So for each image, you should be typing out the command on your own terminal and confirming you get similar results.
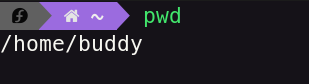
As you can see I am in my users home directory (a special location, and super common folder in your files; on Mac its /Users/USERNAME on linux its /home/USERNAME).
This is a super common place, so it has a shortcut that can be accessed with ~ called the tilde and its above tab and to the left of the 1 on the keyboard.
The ~ can be used to access your home directory (a directory is just another name for a folder) anywhere on your computer.
You’ll see more of it later.
ls
So the pwd command tells you were you are, the ls command let’s you look around at the current location, to know what is around you.
So in terms of your filesystem the ls command lists all directories and files inside the specified directory (defaults to your current working directory if no directory path is specified).
I have mine set up to give different colors to folder, which you can ignore for now (at the end of this series I will show you have to customize your terminal to have a fancy terminal as well).

The output of the ls command let’s you know what files/folders are in a directory.
For example, I have several differnt folders in my home directory.
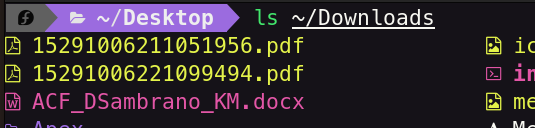
To get some more practice, let’s explore what’s inside the Downloads folder.
Arugments
The ls command can also take input arguments.
Arguments are inputs to a command to adjust its functionality.
In the case of the ls command, you can add a path as an argument, so instead of listing the contents of the current directory, it will list the contents of the specified directory.
Lets try it with our downloads folder:
Note: That unlike most other programming languages,
bashdoes not use parentheses to enclose the arguments. Each on is simply separated by white space.

😲 Uh-ohh, we got an error, what happened? The ls command already said that we have a downloads folder.
Reading the error it says that there is no downloads folder, but thats weird we just saw it in the previous command, what gives?
Well… this is an important lesson.
All shell commands are CASE SENSITIVE.
So, while we have a Downloads folder, we do not have a folder called downloads. That was the problem.
When we use the correct case we get this output.

As you can see, I have a bunch of junk in my downloads folder, which I should probably clean out. But, more importantnly, the command worked now that we made sure that we had the correct case.
To help with the case problem, I personally only used lowercase in my directory and file names. This helps out a lot.
I also avoid spaces in file/directory names because to access them you need to prepend the space with a \, so if you had a file calle my first directory you would need to access it with ls my\ first\ directory.
So its best to avoid spaces altogether.
Its really important to actually try to impletment these new commands, you will not learn them just by reading this post, you have to actually try them out. So take a couple mins now to list out the contents of different directories on your computer.
Options
In addition to arguments, commands can also have options.
Options typically change how the output is displayed, compared to arugments, which typically affect what the function is performed on.
One simple example of a command is ls -G. Test it out to see what it does.
Options as implied by the name are optional, and tend to either be a single - if the option is a single letter (like the -G example) or two -- if its a word.
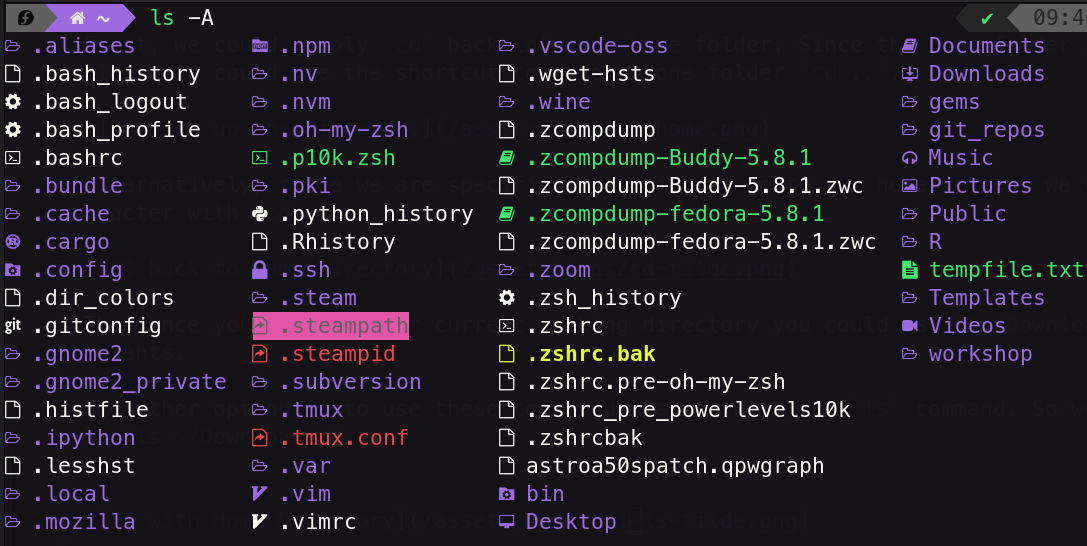
For example, ls --all (or the shorthand: ls -A) shows all files and directories including the hidden files and directories.
A hidden file and a hidden directory are just one that starts with a ..
By default, your OS will hide files and folders starting with . when looking for things.
The ls -A will reveal their secrets.
Here, I am showing a home directory, which has a few hidden folders that would not have been visible without the -A option nor would they be shown in Finder/Window Explorer.
In this case, the .config folder is one example.
There are tons of other useful options for ls. Here are a few noteworthy one.
-lwill Long list you files, so it will print out all the metadata as well.-lhwill long list them in a Human readable format, so you dont have to convert everything from bytes, it will show you them in eith MB, GB, etc, depending on size.
Note that you can combine these options, so try to guess what ls -lhA would do, then confirm your hypothesis by running the command.
Autocomplete
One incredibly useful technique is autocomplete.
Anytime you are using the terminal (this also works for most other languages as well), you can hit the tab key to autocomplete your command.
For example, if I wanted to access the contents of the Desktop, I could type the full thing out or I could just type ls Desk and press the tab key and it will autocomplete to ls Desktop.
Taking autocomplete one step further, you can actually use tab to list out the contents. So let’s say, as is the case for me, you have a folder in your Downloads, but you weren’t quite sure what you called it. You could type out ls Dow pres tab to autocomplete to ls Downloads/, then press tab twice to list out the contents of your directory like this:
now you remember that it was called temp so you can type the t and hit tab again to autocomplete (or you could just continously hit tab to cycle through the options). Pretty neat, huh! This technique will save you a ton of time, not only because you don’t have to type as much, but also so you don’t accidently swap cases or make a typo. Importantly, autocomplete will work on all shell commands (and many other programming langauges as well), so make sure to keep it in mind for the future commands as well.
Now that you know about autocomplete, I want you to take a few more mins listing out the contents of your directories.
Hint: For
zshusers you can even type out partial directories and have your shell complete e.g.,cd Do/tethen hit tab it will give youcd Downloads/temp.
cd
The counter part to pwd is the cd command, which in the analogy allows you to move from one location to another.
In your filesystem that means the cd command allows you to change your current working directory similar to os.setwd in R and os.chdir() in python.
As described in the analogy, the cd command helps us move around in our filesystem.
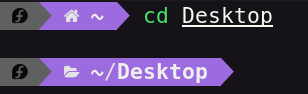
The pwd command showed we were in our home directory, but we used the cd command just now to move to our Desktop folder.
This is just like if you had Finder or Windows Explorer open to that location and move through your files by double clicking the folder icon.
With the cd command you can specify the location, but like I said in the analogy at the beginnner, you don’t know this place, so you have to give precise directions either from where you currently are (relative path), or from a well known place (absolute path). The well known, highly visisble place in your filesystem is that home directory (or your root directory noted with /).
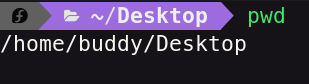
Now that we are in the Desktop, you can see the pwd command changes its output to reflect our new current working directory.
While we are here, of course we can still use the ls command to see the contents of the Desktop; however, now that we are currently inside the Desktop folder we can no longer just type ls Downloads.
Again, this is because we are in the Desktop folder, and the Desktop folder does NOT have a Downloads folder.
This would be like clicking the Downloads folder inside of the Desktop folder on the GUI, you can’t because its not there.
So if we want to access the contents of the Downloads folder we have few options.
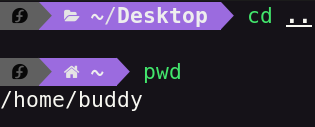
First, we could simply cd back into our home folder. Since the home folder is one folder above the Desktop folder, we could use the shortcut to move up one folder cd ...
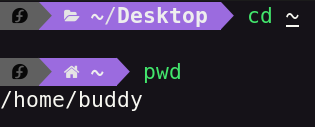
Alternatively, since we are specifically trying to go to our home folder, we could also use the special ~ character with cd ~.
Then once you changed your current working directory you could use ls Downloads to access that directories contents.
The other option is to use these techniques along with the ls command. So we could use ls ../Downloads or ls ls ~/Downloads/.
Personally, I switch back an for depending on my needs.
For example, if I am nested deep inside a folder structure I might just use ~ but if I am just one folder off I would use ...
Now, you should be able to try out cding around your different folder (try hidden ones too!) and use pwd to know where you are and ls to see what is around you.
Try to make sure you are using all the commands and options we talked about so far.
Also test out what happens when you do cd ../..
Recap
We covered a lot just now, so let’s recap.
You learned how the pwd, ls, and the cd commands can be used to look around you computer.
You also learn how some commands can have arguments to change what they perform their action on, and options which affect how the output is shown.
Finally, you learned about the special ~ character to always return home as well as .., which moves you up one directory.
First of all, these new skills alone are pretty cool, and you should pat yourself on the back for your new skills. However, I do want to show you one exciting new thing, just to spark your interest for the next tutorial. When I saw this in action the first time my mind exploded 🤯, and I genuinely tried to show everyone I knew.
To get the full effect, I recommend you cd to your Desktop but make sure your Desktop is still visible, so you can see if anything changes. Then try running any (or all) of the three following commands:
mkdir my_first_dir
touch my_first_file.txt
echo "Hello, World" >> my_first_file_with_text.txt