So whats the deal with GitHub/Gitlab
In this post you will learn the basics of GitHub. By the end you will know:
- How to set up a Git repository on GitHub to store changes
- How to pull content from a GitHub repo and continue editing it
- How to collaborate with any other scientist using GitHub solving basic merge conflicts
Prerequisites:
- Have read through my series on the basics of
bashor have a general understanding of how to move around edit files inbash
How Does GitHub/GitLab Factor Into all of This?
GitHub and GitLab (an open source alternative) are primarly used (for scientific programming) as remote (i.e., cloud-based) repositories/server/storage location. Both GitHub and GitLab have several nice, helpful features to make developers communicate and interact with one another more and encourage collaboration etc. However, as I meantioned, most of the time when you start out, you will only use them as repos (repositories) to store your own code or as a way to find other people’s code.
Microsoft bought Github in 2018 and there was a situation where Microsoft, without the knowledge of its users, took thousands of repos and used them to develop the Codepilot AI. So, if you hear arguments against GitHub, it likely this in addition to Microsoft’s general disdain for Open Source Software.
Once you have made a GitHub/GitLab account and authorized yourself on your machine, you will be able to add a remote destination (i.e., your GitHub/GitLab account page) to send all the commits you have made (via git push).
The git push commands simply send all the changes that you made locally on your computer to the remote server.
That way you always have a backup in case something goes wrong with your computer, WAHOO!!
Very commonly, you may need to download either someone else’s code or your own code (to a new computer).
If you already have the git repo on your computer, you can simply download the new changes that you don’t already have with git pull.
And Finally, if you don’t have the repo on your computer, you need the git clone command.
This will clone the repo to your local machine, and importantly, it will also download all the changes that were ever made, so you have a full history of the project.
GitHub Example
Of course, you need to have a GitHub/GitLab account for this to work. They have similar structures, but I will specifically focus on GitHub in this tutorial. So, head over to GitHub or GitLab and create your free account.
GitHub Authorization
If you have not done so already, make sure you install gh the GitHub command line tools.
It is available in all the standard package managers.
Below is an example for MacOS users with homebrew.
# Installs homebrew
/bin/bash -c "$(curl -fsSL https://raw.githubusercontent.com/Homebrew/install/HEAD/install.sh)"

# Installs git and github command line tools
brew install git gh
Alternatively, you can install the github command line tools from there website.
Once done, you will need to authorize yourself.
This is a one time process and can be done with gh auth login.
Follow the on screen prompts to complete the autorization.
Here are some good default options for first timers.
- Account type:
GitHub.com - Preferred Protocol:
HTML, reccomended for beginners, butSSHis great as well (my preference). SSHkey (if applicable): leave default unless you are familiar withsshkeys.- Authentication:
Login with web browserYou will need to copy the code in the terminal before accessing the link, holding control while pressing the link in the terminal should open it automatically. Login as usual and paste the code to authenticate, then read and accept the prompt.
Once you have completed the setup, you should have a screen that looks similar to mine (depending on your selected options of course).

Congrats🎉! You have now successfully connected your terminal to your GitHub account. Next we will learn how to link your local repo with your GitHub account so you can store all your changes.
GitHub Repo Setup
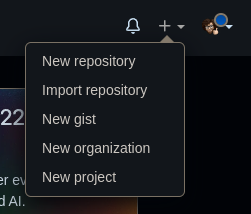
The easiest way to get started is to first head over to GitHub.com and create a new repository by clicking the + in the top right:
When you create a new repo on Github you will be prompted with the following options. Fill them as needed until you get the next section.
Here we don’t need to add a README.md, .gitignore or license, if you did you can restart to follow along or follow the git clone section.

Once you click create repository, then you will see the follow screen.
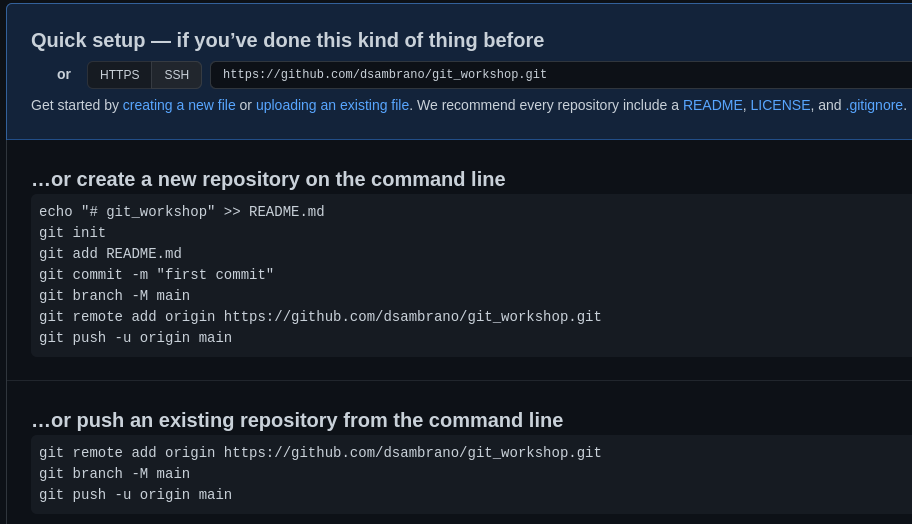
As you can see there is an option for creating a new repo and one for pushing an existing repo.
Basically, if you already ran git init on a repo that you want to upload to GitHub, use the second one, if not, use the first.
Following these prompts are pretty straight forward, but I do want to highlight what each line is doing, so you it will be easier to remember them next time. (Note that the final 3 lines are equivalent across both options):
- The
echoline creates aREADMEfile with a title header. - Next we use
git initto initializes a repo as we did in Taking Git for a Test Drive. - Next we are asked to add the
READMEfile and make the repos firstgit commit, just like in Taking Git for a Test Drive. - Afterwards it uses the
git branch -M mainto rename to current branch tomainwhich is the default branch naming scheme for GitHub (not required if you already add this to your config in the series intro or when warned). - Then, we use
git remote addto add the newly created GitHub repo as the remote repo for this project, and we give it a nickname calledorigin. - Finally, we push all local commits (with
git push) to the new GitHub repo, and the-u orign mainoption/argument tellsgitto always use this particular GitHub repo for this branch.
Hint: You can actually store different branches on different repos (or the same repo, which is the most common).
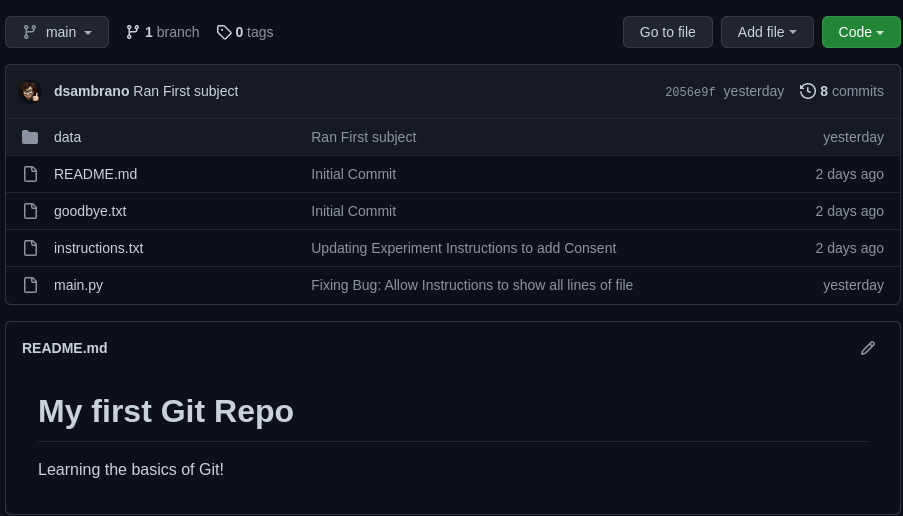
When you complete all the commands you should be able to refresh GitHub and to see your repo.
Congrats🎉!
You successfully uploaded your repo to GitHub, now anytime you want to upload all your commits you simply need to use the git push command to send all your changes to the remote repo.
I typically do this once at the end of the day, so I make a bunch of commits throughout the day and then upload them all at once, but that may very depending on the needs of the project or if I am collaborating with someone who would constantly need the most up to date version.
GitHub Clone Repo
So far, we have shown you have to update and modify code for a repo that is already on your computer.
The other common situation that will happen is you will need to get someone else’s code (either for a collaboration or just because its freely available to help solve your problem) or your own on a new computer (that did not already have the repo).
This can be done with git clone, which as the name implies, clones the repo from GitHub to your local computer.
Importantly, it also downloads all the history so you can view, and if they ever make any changes you can also have access to them with git pull, to pull the changes down from the server.
git pull is basically the opposite of git push. git push sends local changes to the remote and git pull retreives any changes on the remote repo to your computer.
To gain practice with these skills, let’s go through an example.
First we need to clone the repo.
For simplicity, I am going to place these repos next to each other in a git_repos directory.
git_repos/
├── my_first_git_project # The original repo
└── git_workshop # The clone from GitHub
To actaully clone the repo, first you need to cd to the directory where you would like to keep the repo.
In this case, that would be git_repos.
Then we need to type
git clone GIT_REPO_URL
To get the GIT_REPO_URL you can go to GitHub and click the green code button.
There are three cloning protocols (either HTML or SSH), but all do the exact same thing.
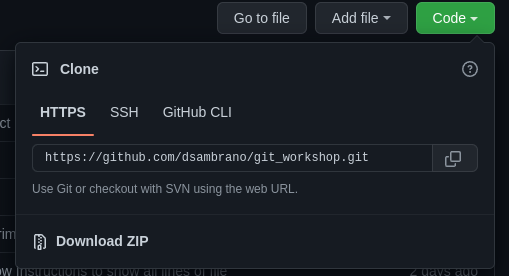
So with this example, you could use any of the following 3 lines:
# Only choose 1 of the following options
git clone https://github.com/dsambrano/git_workshop.git # For HTML
git clone [email protected]:dsambrano/git_workshop.git # For SSH
gh repo clone dsambrano/git_repos # Is a third option using the GH CLI
Now you should have the same repo in two locations. For our purposes, this will simulate you and a collaborator working on the same code or it can simulate you on two different computers (either the office and home or your computer and the experiment pc), whichever is most likely given your workflow. Next we can demonstrate how to share changes across the multiple computers.
Start by opening one of the repos, I’ll open the new one cloned from GitHub.
And we need to edit a file, I will edit the goodbye.txt replace the only line with Thank you for participating! Have a great day!.
Then of course, we need to use git add to add the file and git commit to commit the changes.
Again, git commit only stores the changes locally, now we can use git push to send them to the cloud.
Hint: If you want to try something new, you can actually edit files directly from GitHub. When in a GitHub repo, you can press
.to get access to the Visual Code Studio IDE. From there, you can make all the changes you want and save them with a message, just like you would if you were using VCS from your local computer.
Next we will move back to the other repo (the original one) and make a change to the instructions.txt file replace World with Participant in the first line.
As per usual, we will add and commit these changes.
Again, this is similatuate you and someone else both made changes to the same project, so now its time to try to share those changes.
To do so we need to send our local changes to GitHub, so that our collaborator can pull them down.
But if we try to git push, we will see this error.
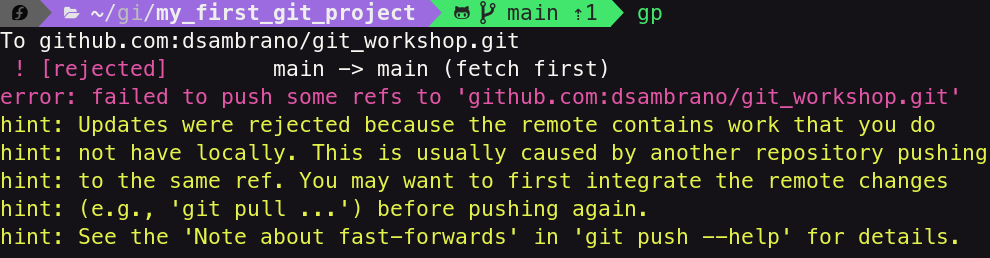
This error is telling us that we tried to update the main GitHub repo, but our
current files are out of date/old.
So, to fix this we must first pull down (git pull) the changes from the remote repo (git will automagically integrate them with the changes we already made), then we can push all of the changes back up the GitHub.
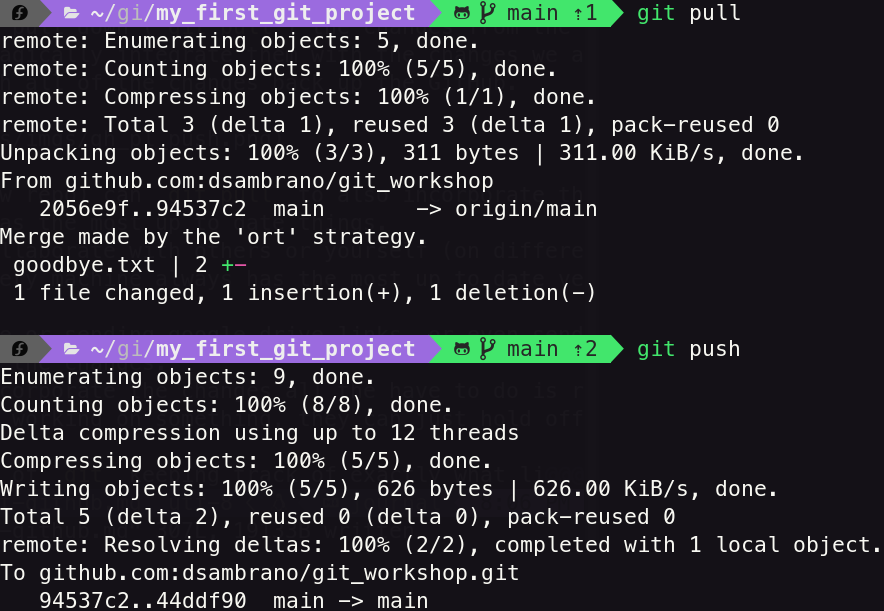
Now, our collaborator (the new repo) can git pull to also incorporate the changes, so that everyone has the most up to date code.
This is how you can easily collaborate with others or yourself (on different machines) and make sure every machine always has the most up to date versions of every file.
No need to use a flash drive or send google drive links, or even send emails updating them with the changes.
Whenever they are ready to incorporate the changes, all the have to do is run git pull, but if they are working on something, they can just hold off.
All this comes from the magic of git keeping track of exactly what lines in what files have been changed.
When different lines have been altered git intellegently integrates these changes.
But what happens when two people edit the same line?
How does git handle these situations.
When two people edit the same line of a file, git informs the developer that there was a conflict when it tried to merge the two verions.
git will NEVER remove or edit things, unless someone asks it to, so you have to resolve the conflict.
Merge Conflicts
Merge conflicts occur when you are trying to update code that someone else has already updated.
Because of this, git is not sure which is the correct version, so it asks you to fix it.
Let’s simulate a merge conflict so we can see them in action, and you can learn how to resolve them.
To start, first make sure both git repos are up to date by using git pull to get all the changes.
Just like before we are going to use the two repos to simulate two different computers.
But this time, instead of editing two different lines, we are going to edit the same line of the same file in the repo.
Specifically, I will change the first line of the instructions to say Hello from the OG repo in the original and Hello from the Clone from the cloned repo.
First, I will edit the original repo, git add, git commit, and finally git push, the changes.
Next, I will edit the cloned repo, git add, and git commit the changes.
But this time, when I pull down the changes, I will get a merge conflict because we both edited the same line of the same file.
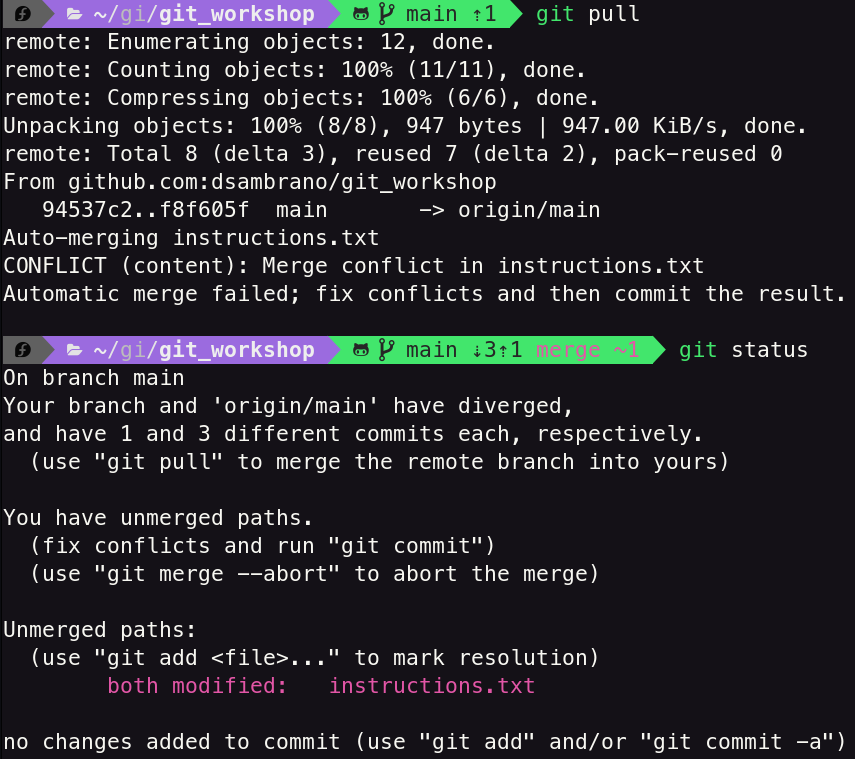
As the error message indicates, we have a merge conflict and must deal with it in order to continue.
You can also run git status to get some more information on the problematic file/files.
Here, you can see it was the instructions file, and git tells us that it was modified both locally and in GitHub.
If we open that file up for to edit it, we can see that git helpfully altered the file to let us know what the problemactic line(s) were.
Here is specifically what mine looks like.
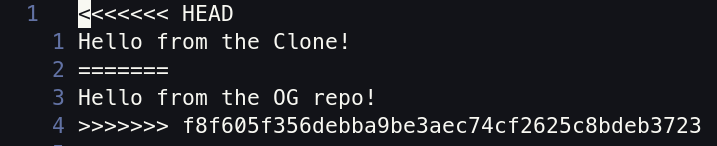
The text between <<<<<<< HEAD and ======= is what was changed in the local repo you are currently in (in our case the clone).
The text between the ======= and >>>>>>> HASH is what was changed in the remote repo and the corresponding HASH where that line was changed.
So in our case, since I was currently in the cloned repo, the top section was the line that was changed in the clone and the bottom was what was changed in the original.
The rest of the file was not changed, so it does not have these same markings.
All we need to do now, is choose one (by deleting all the unwanted text, e.g., ====, >>> HASH, and << HEAD) or erase both and replace it with something else.
In my case, I will replace the first line with Hello, I edited this line in both the clone and the OG repo.
Now, we can add this file with the new changes commit them and push them to GitHub.
Wahoo! We just resolved the merge conflict! If you want to check out what I did here, feel free to go to the GitHub repo. You can even check the commit history to see exactly what was changed and when.
Recap
First of all, give yourself a pat on the back, you just learned how to use GitHub to collaborate with others and remotely store your coding projects.
Combine that with the skills you learned in the previous post and you have a great foundation.
Going through this series you learned the basics of git and GitHub.
Now, you can effectively use git and GitHub to create reproducible science or start your journey as a software engineer.
The final post of this series will highlight why you need git/GitHub and why DropBox/Google Drive simply are not enough.
Also before you go, below is some extra practice to improve your skills.
Extra Practice
Its really important you implement your new skills. This is why I had you go through all the examples along side the tutorial. To get even more practice, I reccomend taking one of your existing projects and initializing it as a git repo and upload it to GitHub. I want you to take one of your projects and initialize it as a git project and store it remotely. This can be as a private repo, if you want, but just getting the practice to have everything stored with an extra backup is a good idea.