I Don't... GIT it
In this series you will learn the basics of Git and GitHub/GitLab. By the end you will know:
- The 4 stages of the git workflow
- All the commands relevant to initalizing and working with a git project
- How to set up a Git repository
- How to set up an online repository (via either GitHub or GitLab)
- How to collaborate with any other scientist using Git
Prerequisites:
- Have read through my series on the basics of
bashor have a general understanding of how to move around edit files inbash
Git Series Introduction
This series will show the the ropes for git.
By the end, you should be able to transfer all your project to git and be able to collaborate with people on GitHub.
Gone will be the days of using a flash drive to move the experiment from your computer to the stimulus pc.
You will learn the proper way to deal with changes to your code.
For the series intro we will get you up and running.
You will learn how simple git really is as well as the general structure of git.
By the end you will prepare to install git and get things going.
You Only Need to Know 3 Commands
Git often seems super scary at first, so let me just start by saying that 90% of the time you will only need to use these three commands.
git add .
git commit -m "Relevant Message Describing Changes"
git push
And if you are feeling fancy and want more coverage, adding these five commands will cover 99% of what you need in begginer settings:
git init
git clone
git status
git pull
git log
If, for whatever reason, you are still scared off, there are GUI options to take advantage of to use git (including built into R and VS code and even Desktop app). I won’t cover them here; however, this post (and series) will still be useful for you because I will cover the structure of git to help you understand what is happening at a high level.
What is Git?
Git is a Version Control System, thats all. Its sole purpose is to help you (pontentially from your self). And speaking from personal experience, getting comfortable with these commands has saved me hours of headache.
Here are a few examples of situations where git can improve your workflow:
- When you try to update your code (by adding a new feature or improve its performance/readbility) and somehow everything stops working.
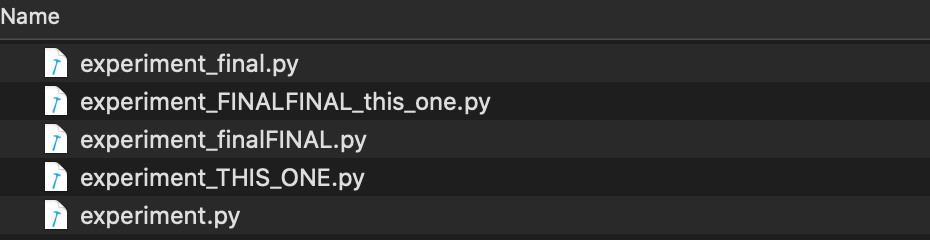
- Save you from the hell of having multiple versions of a file, all of which are named:
- Prevent the issue of having different versions on different computers
- Allow easy collaboration on coding files were everyone can edit the same file and merge any changes when it is convenient.
- Have a history of all the changes you have made on a project with the ability to revert back to a point when the code was working.
Undoubtedly you have experienced several, if not all, of these situations in the past. Well all these problems will be solved when you start incorporating git into your workflow. All git will do is keep track of every file in a folder you tell it to. At various points through development, you can make checkpoints that you can return to if something goes wrong. If you are working from multiple machines or working with a collaborator, you can all have the must recent code with a shared repo and just pull the changes as you need them. To get started, let’s talk about the different stages of git.
Four Stages of Git
There are 3(4?) basic stages of git. And a file can be in any of these stages.
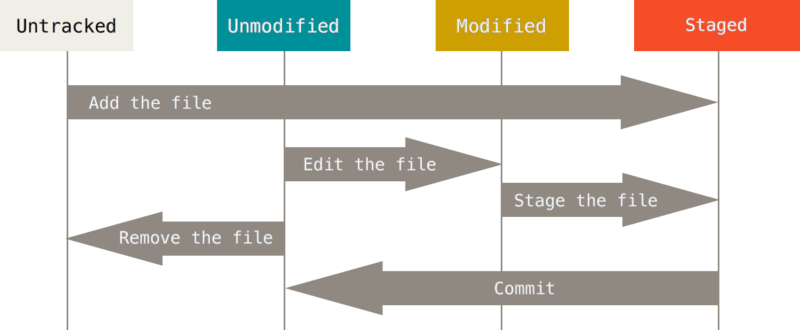
Untracked: The first and easiest to understand isUntrackedthis is simply a file that you have not asked git to track.Unmodified: These are files that you asked git to track, AND they have not changed since you last made a commit (i.e., made a checkpoint/savepoint).Modified: These are also files you asked git to track, BUT these have changed since the last commit.Staged: Finally, you have files that you have told git to track, made changes to these files, AND you have already added them to the queue (viagit add FILENAME) for the next checkpoint. That is, it is added to the queue and are waiting for the next commit and corresponding message (viagit commit -m "REALLY IMPORTANT MESSAGE"). Once you have committed the changes, the checkpoint is stored and all staged files are now officiallyunmodified. Then the cycle continues.
Installing Git
First double check to see if you have git installed already by typing git -v in your terminal.
If you get a command not found error, then you don’t have it installed.
If it spits out a version, then you are good to go (though you may need to update it). If you already have git installed you can skip the installation section. Otherwise go to the installation section relavent to your computer’s software and continue.
Mac OS
Many programming and scientific applications require xcode on Mac, which installs git automatically, so you might have it already.
Double check by using the method described above.
If you don’t that’s ok because you will definitely xcode in the future.
Inside your terminal of choice, type the following command to install xcode:
xcode-select --install
If you have a package managers like homebrew or MacPorts, you can install them via these methods as well (e.g., brew install git).
Finally, you can use the GUI installer go the Binary installer section
Hint: If you don’t already have it installed, you might want to install homebrew with the following command
/bin/bash -c "$(curl -fsSL https://raw.githubusercontent.com/Homebrew/install/HEAD/install.sh)"
Linux
On most linux distros you can simply use the relavent package manager to install git.
For example, on debian based distros: sudo apt install git-all.
But in most many cases its installed by default or with the standard dev tools.
Windows
You can install git via chocolately or the GUI installer.
Additionally, you can also install git with linux via the Window’s subsystem for Linux pipeline, if you are familiar with that.
Finally, for beginners specifically, I would recommend that you install gitbash, so in addition to git, you can also use all the bash commands on Windows.
Git Config
There are tons of configuration options for git. And we don’t have time to cover all of them, but I do want to cover two. Specicially, we are going to set up your username and email for all the changes that you will make. This isn’t required but its super simple so might as well do it. The follow lines of code assign any changes that you specifically make, to your username/email combo. Kinda like signing off on your work with a signature, that way we can figure out who did what.
git config --global user.name "YOUR NAME"
git config --global user.email [email protected] # Default: [email protected]
The second config option that we will edit is setting your default initial branch name. Again, this is not require, but by default when you create a repo you will have a master branch. However, by convention, we change it the main branch. The following line will make all new git repos use the main branch so you will not have the change it manually.
git config --global init.defaultBranch main # Set default branch name
Recap
Hopefully, by now, we have helped you overcome your fears of git and gave you a simple to understand introduction for why git is useful. You also learned the basic description of the different stages of git. Finally, you should not have git installed and set up some basic config options. So now, you are ready to start the rest of the serires. In the next post, we are going go through an example git repo. You’ll learn how to initalize a git repo, create commits and check your repos history!