Taking Git for a Test Drive
In this post you will learn the basics of Git and GitHub/GitLab. By the end you will know:
- The git workflow
- All the commands relevant to initalizing and working with a git project
- How to set up a git repository
- How to check through the history of your git repo
Prerequisites:
- Have read through my series on the basics of
bashor have a general understanding of how to move around edit files inbash
Git Example Time
Now its time to see what all the fuss is about and try out git.
In this tutorial, you will learn the basics of git and how to save commits (checkpoints) for you code along the way.
Before we get started make sure you have git installed by running git -v.
If you see any errors, make sure you follow the installation instructions.
Initalizing a Git Repo
Now, we will follow a super basic example to git an understanding (pun intended).
First, let’s set up the following directory structure.
my_first_git_project/
  |-- hello_world.txt
  |-- goodbye.txt
Make sure each file has some text in them.
If you are not sure what to include, make sure each of the files contain 1 line of text that is just the same as the name of the file without and extension.
So the hello_world file can just be have the content Hello World.
Next we need to create a README.md file.
These are super important and as the name implies you should always read this before using some software/code you get online.
As the extension implies, README.md’s are in the markdown format.
If you are not familiar with markdown, check out my post.
Hint: This also means that you should always make a README file anytime you make a project.
In this file, you will find basic information about how to setup/configure and run the code in the git repo.
It also often describes the basic functionality of the code as this is the first thing anyone will see about the project on GitHub/GitLab.
For our purposes since this is a basic project, you can just add a Level 1 header and a simple description.
# My first Git Repo

Learning the basics of Git!
Now that that is all taken care of, we can initialize your repo with:
# First CD to the directory you want to initalize
cd DIRECTORY_OF_INTREST # e.g., my_first_git_project

# Then Initalize that directory
git init
Hint: Make sure you are already
cd‘d into the correct directory. It is common mistake for people initlized there home folder/Users/CodingBuddy/which will track your entire computer 😱! Even I did it when I first started 😅, but don’t worry you can just remove any.gitdir to stop tracking the parent directory.
You can confirm everything worked correctly with the ls -a command.
If you see an output that shows a .git file then you have correctly initialized your repo 🎉.
~ my_first_git_project ls -A
# .git  goodbye.txt  hello_world.txt README.md
If you got a warning talking about using master for the inital branch, feel free to follow the instructions, but its just a warning and won’t harm anything.
If you got another error, go back and make sure that 1) you are in the correct directory and 2) that you haven’t already initalized that directory or one of the parent directories.
If all else fails, double check that your installation method was successful with git -v, and if not try to install git again.
All the magic is stored in this .git folder.
It is where git will track all the changes that occur and store the history of all the commits.
But it only tracks changes for files inside the parent folder to the .git directory.
In other words, in our case it will track all changes to the my_first_git_project folder (and all subfolders), but it will not track changes anywhere else.
This structure allows you to have multiple git repos on your computer and have them all independent of one another.
In other words, making changes in one git repo won’t affect any other repo.
Finally, if at any time you want to end the git repo and erase the history (but not the content currently in the folder), you can just delete this directory.
Git Basics: Status, Add, and Commit
Now that we a git repo, we can run through the stand git loop.
In the standard git loop, you first make changes to files, queue them for the next commit (git add), and finally commit all queued changes (git commit saving them as a checkpoint).
To get started, we will introduce git status to see the status of the repo.
This is a helpful command that will give you what summary of your current git repo. For example, it will show you what branch you are on, and shows all the files in the directory and what stage they are in.
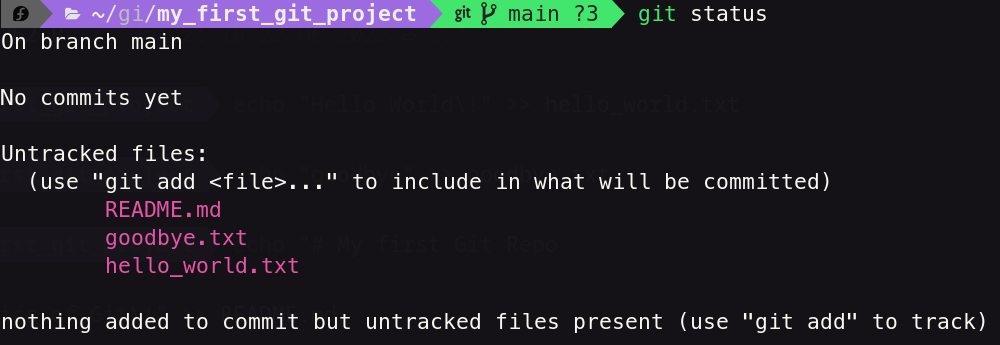
As a reminder, Untracked is one of the stages in which the files have are not currently being tracked by git.
So now, we need to tell git to track all the files.
Once tracked, git will take note all every change that occurs to a file.
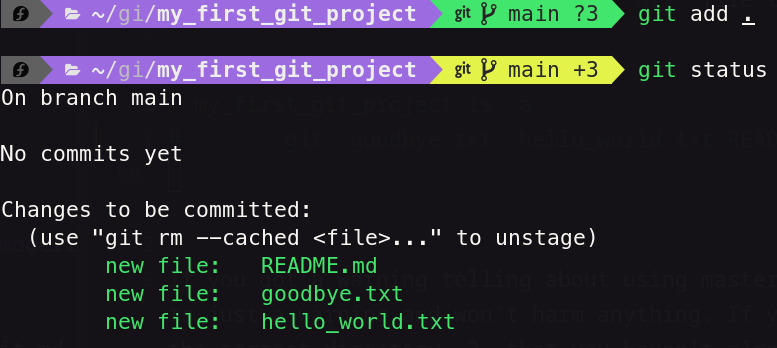
We can track files individually with git add hello_world.txt goodbye.txt or you can use the shortcut to add all files in the current directory.
git add .
where the . just means add everything in the current directory (and the subdirectories).
Once done, the git status will update letting you know everything is now Staged and ready for the next commit.
The final step of the loop is to tell git to commit all the changes.
When you commit one or a group of files, they will be saved as a checkpoint.
All the previous commits will be saved so you can always go back to any of them in case something happens.
So when you commit some files, you need to write a small message describing what was changed.
You can commit all Staged files and write a message with the following command:
git commit -m "Relevant Message"
Each time we want to save the current state of the repo we need to add all relevant files (most of the time you just add everything with git add .) and then commit them with a relevant message git commit -m "Important message".
Since this is the first commit, Inital Commit works, but for all future commits, I recommend that you write something that concisely explains the changes that are being made.
Once you make the commit, you will see a log of everything that changed,
Now since, nothering has changed since the last commit your git status will be clean.
Here is what mine looks like:

Commits are most effective when they are small, so it is good practice to have each commit focus on one change.
If you need to make more changes commit the ones that have already been changed first before starting on the next.
Small incremental commits makes it significantly easier to identify problems in the code because you can always revert the problematic commit.
If you have very large commit the bug introduced might have also been committed with a new important feature, making it harder to seperate out the bug.
Your History
Now that you got the basics down, let’s make a few more commits for some additional practice, and so I can show you their true power.
Make at least two more commits adding some things to your files or adding new files.
To follow along, I will make a few commits as well.
In these, I added various lines of code and files, it does not really matter what you put.
This will give you more practice with adding commits, so try to edit multiple files and only add some of them on a particular commit, have some commits where you delete code, etc.
Essentailly, make a few and explore along the way.
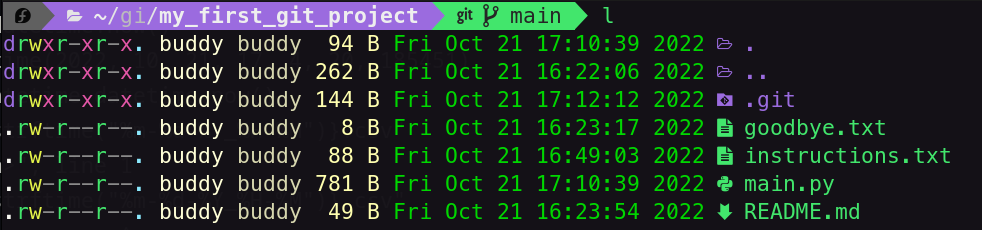
Here is what my repo looks like now!
Now let’s look at all the commits I made.
To do that I will use the git log command.
I typically also add a couple of arguments to make mine look a little nicer.
You are more than welcome to mimic this by adding one or more of following options (--oneline --decorate --graph --all; while you are there remove them one by one, so you know what each does).
Better yet, I make that command into and alias, so I can just type out glog, more on aliases here and here.
Here is how my history looks:
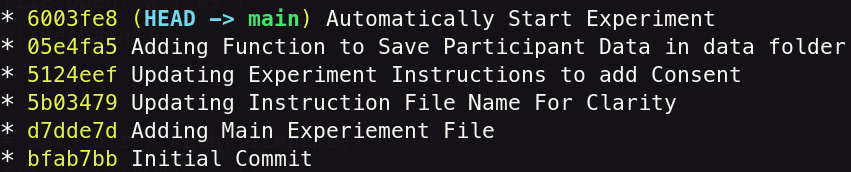
This log shows me the whole history of this git repo.
And for those who like a little more detail you can always add --stat to see which files were changed and by how much.
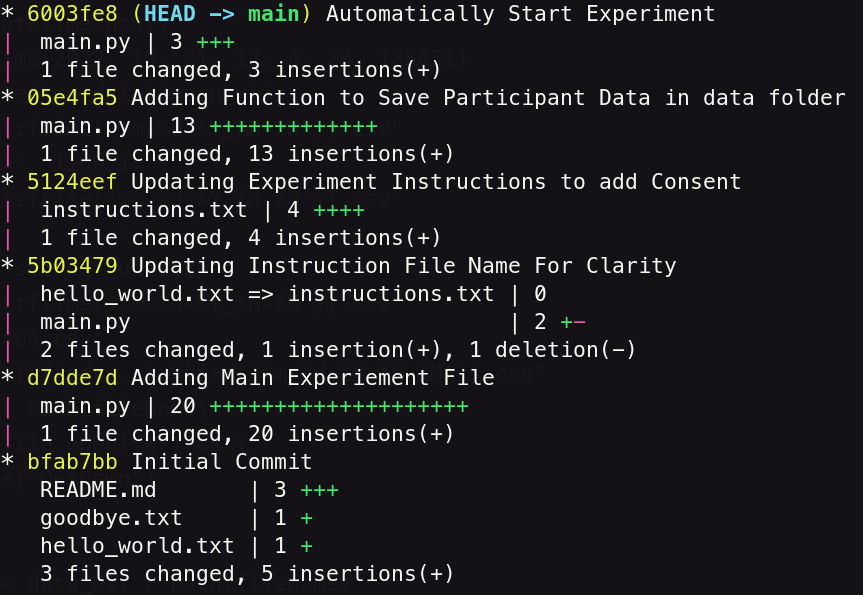
For example, the second line of the summary says that 3 lines were added to the file that commit.
You can see a little lower (about half way down commit hash: 5b03479) that I added one line and deleted one line to the main.py and renamed the hello_world.txt file to instructions.txt.
Since you have the whole history, you are completely safe.
All of your data/changes are stored safely, ready for you any time you need them.
If you ever make a mistake, you can always roll back to the previous commit (or even older ones).
That’s a little bit more advanced (simply because all of the options available depending on precisely what you want to do), plus you already learned a lot today, so I will add it to a future post in the series.
But before I go, I do want to highlight a few common mistakes people tend to make when they first start off with git.
Common Errors and Hiccups
When people first tryout something new, its expected to make a lot of mistakes.
So, I just wanted to take the time to highlight a few common ones I see for people new to git.
The first is for people to inialize their home directory (~).
This typically happens by forgetting to cd into the correct directory before running git init.
If you are not sure what cd is, checkout my series on bash.
The next common mistakes is more of a group of mistakes.
They all are centered about bad commit habits.
The first, and by far most common, is people submitting vague, unhelpful messages when adding a commit.
Some examples include: Fixing Typos, Fixed Bug, or Added Function.
These messages give absolutely not information about what changed since the last commit.
Instead, you should make more informative messages, like these: Fixed Typos in Instructions, Bug Fix: Updated Frame Rate Issues Preventing Screen Updates, or Added Function to Allow Users to Restart the Application.
They are more informative for you and anyone else who edits the code to allow them to know what commit to checkout if an issue occurs.
Second is not committing often enough.
Again commits are intended to be all centered around one small change.
So let’s say you are making changes to a file and you realize you also need to make a change to another section of code.
If the new code is related to the same problem you are tackling, thats ok, but if its focusing on some other thing, stop and commit the changes you already made before continuing.
Of course, there will be cases where you will need to edit lots of files for a single commit; that is ok if the changes in each file are all related, but if not, try to make them separate commits.
Recap
First of all, congratulations 🎉!
You just learned how to initialize a git repository and make a few commits.
You are off to a new future of version control!
No more worries about losing code or transferring.
In the next section you are going to learn about GitHub.
You will learn how to connect your GitHub account to your terminal and save all your commits on GitHub.